Getting a Mesh In Front Of Your UI In Unreal Engine
Context
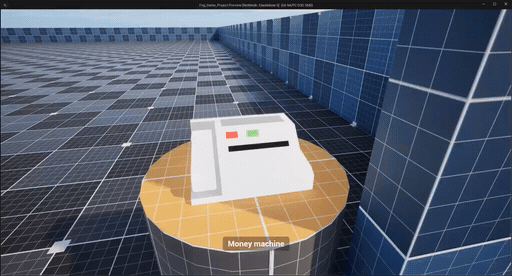
A month ago I was implementing an inspection system for my game1. The goal was pretty simple:
- The player interact with an object;
- Then the object is placed in front of the camera;
- And the player can rotate it to inspect it.
When I started working on the UI part, I wanted to display the object in front of the UI with a nice transition.
This article explain how I achieved this effect.
In this article, I assume you have a basic understanding of Unreal Engine’s UMG and C++. I also use Unreal Engine 5 in this project, but I think that you can apply the same logic to UE4.
Steps
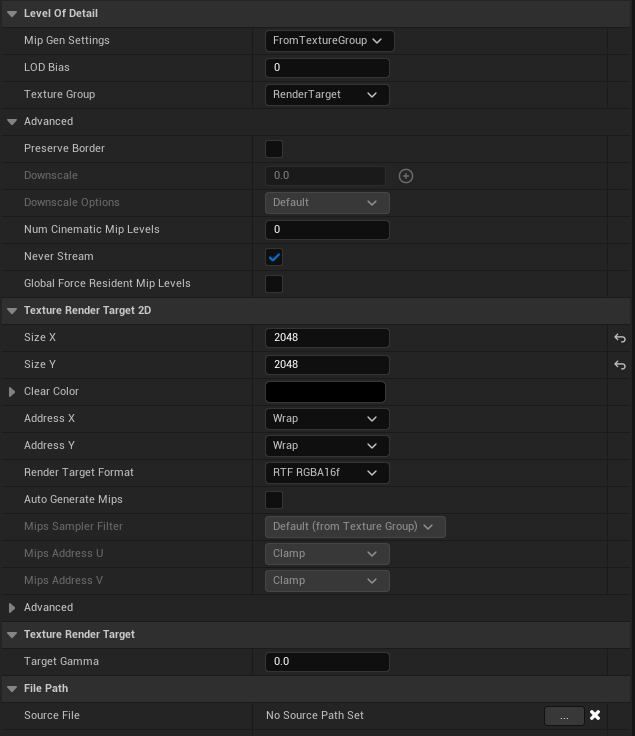
Create a RenderTarget
And set the Size X and Y to 2048 both. I named it TR_InspectionTexture.2
You can change the values of Size
XandYto match your needs.2048worked well for my usecase.
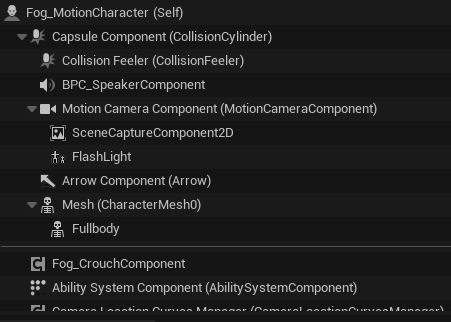
Configure the SceneCaptureComponent2D
Open your BP containing the camera you want to use to capture the object3.
In my case I will use my character BP named
Fog_MotionCharacter.
Add a
SceneCaptureComponent2DUpdate this component configuration as such:
- Set the Texture Target to the
TR_InspectionTexturecreated earlier - Set the Primitive Render Mode to
Use Show Only List - Set the Capture Source to
Final Color (with tone curve) in Linear SRGB - [Optional] I’m using Ray Tracing in my project so I set the Use Ray Tracing to
True. But it’s not mandatory.
- Set the Texture Target to the
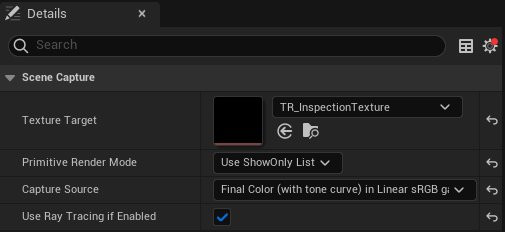
Capture the object to render
We specify to the SceneCaptureComponent2D which object we want to capture. In my case, I implemented this in my PlayerController4.
In this example, this code is triggered when the player interact with an object.
1
2
3
4
5
6
7
8
9
10
11
12
13
14
15
16
17
18
19
20
21
22
23
   void AFogPlayerController::Input_Interact(const FInputActionInstance& Instance)
   {
       //...

       if (ABaseObjectInteractable* Interactable = Cast<ABaseObjectInteractable>(FocusedObject.Get()))
       {
           Interactable->OnInteraction();
           OnInteractingWithObject.Broadcast(FocusedObject.Get());

           // Get controlled pawn
           if (AMotionCharacter* CurrentPawn = Cast<AMotionCharacter>(GetPawn()))
           {
               // Get SceneCaptureComponent2D and set the focused object to be the only one visible
               if (USceneCaptureComponent2D* SceneCaptureComponent = Cast<USceneCaptureComponent2D>   (CurrentPawn->GetComponentByClass(USceneCaptureComponent2D::StaticClass())))
               {
                   SceneCaptureComponent->ShowOnlyActors.Empty();
                   SceneCaptureComponent->ShowOnlyActors.Add(FocusedObject.Get());
               }
           }
       }

       //...
   }
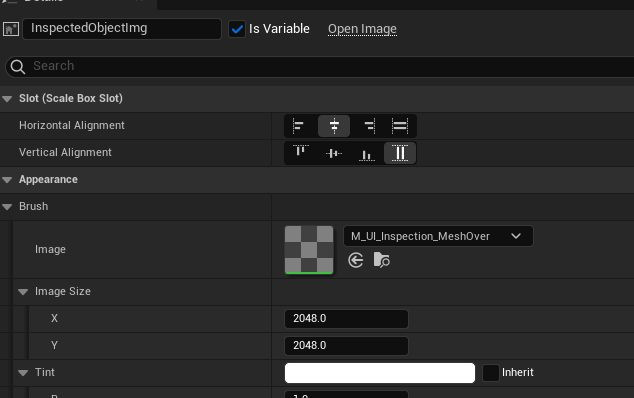
Update the UI
Open the widget BP you want to display the object in5:
- Add an Image into the widget of your choice
- Set the Brush’s Image to the Material you’re going to create in the next step.
Create the Material
And here’s the Material6
- Set the Material Domain to
User Interface - And set the Blend Mode to
TranslucentWanna copy the material? ➡️ https://blueprintue.com/render/hi9bvf7i/
I forgot to mention that this implementation doesn’t handle the performance part. You should consider adding some logic to enable/disable the
SceneCaptureComponent2Dwhen needed.
Conclusion
And done! You should have a mesh displayed in front of your UI 🎉!
I found it really simple to implement and maintain. But I would love to hear your feedback on this implementation.
Have a fantastic day!